


"Hello! I've been given an opportunity to do a guest post here on A is for Ayla and I'm really excited because I really love reading the blog. Her posts are wonderful and I actually really look forward to reading them.
So a bit about me before we start - my name is Amy and I've been blogging for just over a year, over at Marzipan Stairway. I mainly blog just about my life, fashion, beauty etc. I also really like photography so you might catch some of that over there too! I've never actually written a guest post before so this is all new to me! I was thinking about what I would write for this post and I decided I would do something that interests me but also something that I think would interest the readers of this blog and I eventually decided to write a DIY on making a hair bow easily for free! I'm really into little fashion/beauty type DIYs so I thought I would share some of that with you. I've tried to make it easy with step-by-step instructions and pictures.
Ok. Are you sitting comfortably? Yes? Then we'll begin.
What you'll need:

A pair of old denim shorts/jeans, scissors, needle and thread, a ruler, a pen, some super glue, a plain hair clip and some very basic sewing skills. You could use a sewing machine if you want but I know what a hassle things like this are if you don't have access to one and also, I quite like the way my bow turned out with my messy sewing!
Step 1

 With a pen, draw 2 rectangles on your shorts/jeans - one of 15x12 cm and a smaller one of 6x4 cm and then cut them out. Try to cut right over the lines so that you can't see the pen lines when you're finished. As you can see, I did not do a very good job of this. HA. The larger rectangle will make the main bow part and the smaller one will be the part that goes round the middle.
Step 2

Fold each of the rectangles in half width-wise and sew up the edges. My sewing is not at all neat and I didn't use a sewing machine (which you can, if you'd rather) but I like it like that. I also turned the smaller rectangle in half so that the inside of the denim is showing, just to make a little bit of contrast in the finished bow. You can do the same if you want or just leave the right side showing.
Step 3

Open your scissors and place them on the edge of the larger rectangle as if you were going to cut BUT DON'T ACTUALLY CUT! Simply pull the open scissors from left to right along the edge to create the distressed look we're after here. Do this until enough of the little threads are sticking out the sides.
Step 4

For this step, first move the seam of the larger rectangle into the middle. Remember when you were little you would make fans out of paper by folding about an inch of paper forward then turning it over and folding it back on itself? This is like that. Make a little fan out of the larger rectangle but instead of pinching it at the end of the bow, pinch it in the middle. I'm sorry. I haven't explained very well.
Step 5

Quickly put a stitch through the middle of the bow where you were holding it before. It doesn't have to be neat or tight because you're going to cover it over in the next step. It's just to make it easier while you do the next bit so you don't have to hold it.
Step 6

Next, take the smaller rectangle and wrap it around the middle of the bow where you put the stitch in the last step. Put the two edges together at the back of the bow and sew them together. Also try to put your needle through the middle of the bow to stop the smaller rectangle sliding to-and-fro.
Step 7

Take a dab of super glue and attach the hair clip to the back of the bow. Make sure you do it the right way! Hold it there for 10 seconds or so and then it should be properly stuck.

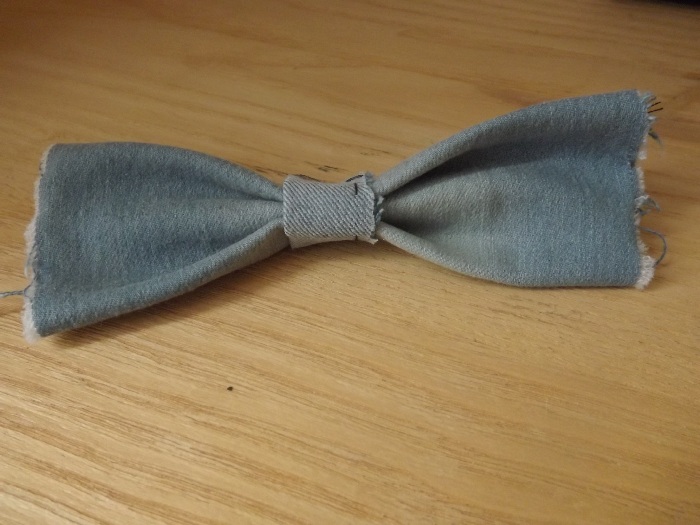
And there you have it! A virtually free bow that you can make with pretty much no hassle. Also, it looks pretty, no?
So. I hope you liked my post, and I just wanted to thank Rachael for letting me write this post on her blog! If you did like this, come over and visit me at my blog - there's a lot more where that came from! x"
Cute! :)
ReplyDeleteSandra from The Puzzle of Sandra's Life
Looks fab, I already follow Amy's blog and love it :) x
ReplyDeleteawesome idea, looks very cute! xx
ReplyDeletewow this is such a cool idea :) nice blog
ReplyDeleteIt turned out great! I just found your blog, and fell inlove with it! I hope you take time to visit my blog too :)
ReplyDeletehttp://funandoblivious.blogspot.com/