photo where in the world_zps9nrywnw4.png
 photo 1X1BLOCKER_zps6d0a1028.png
 photo ABOUTTAB_zpskvq8me9u.png  photo DESTINATION_zpsht7orq6a.png  photo CONTACT_zpssfhajwki.png  photo ARCHIVE_zpsmkirvat3.png

Friday 31 August 2012

St Moriz Instant Self Tanning Mist


While I was up in Scotland a few weeks ago shopping in Sterling I came across a Bodycare store and got all giddy at the St Moriz stand. The brand is currently only available at Savers and Bodycare, stores that are few and far between in Yorkshire. Quite robotically I reached for the oh so famous tanning mousse but then caught a glimpse of their mists. I was in the market for trying a tanning mist after seeing that garnier advert and figured I wouldn't follow the crowd this time. And so off I troddled back into the Scottish countryside with only an expression that reminded me of home back South - a Cheshire grin of course.
I'm happy with the colour of the tan, it's more of a "'I've just been on holiday" colour than the orangey colour you get with most other tanners. I'd say the St Moriz mist is much more difficult to manage however. Because of the spray application it's easy to accidentally go over bits youve already done, resulting in a tan, and a very very dark one at that! The nozzle on the top of the bottle is pretty stiff so you find yourself putting all your power and attention in to pushing it down and forgetting that you've just continually sprayed your arm for about 7 seconds. This all sounds ridiculous and your probably sat thinking "well I wouldn't do that" believe me my blogger friends, this will turn you in to a tanning monster.

Another thing I dislike about the product is that it dries too quickly. Because the mist is light it dries within about 3-4 seconds so once you've sprayed you litterally have to chuck the can and start rubbing it in as quickly as you can. I get a lot of tiny dots where the spray hasn't distributed well and I haven't noticed them when rubbing it in. But I guess it has it's benefits as you dont have to sit around waiting to dry, plus the smell is actually quite good for a false tanner!


As a whole I probably wouldn't buy this again nor would I wear on a regular basis purely because it's too much hassle to apply. The mist costs the same as the mousse, £2.99. I'm actually pretty eager to try out the mousse now to see how they compare, I'm kicking myself for not picking them both up! Perhaps next time I venture out of my moors and fields I'll find another place that stocks them.

Have you done your own comparison between mousse and mist? whats your favourite?


Thursday 30 August 2012

August Favourites


Colgate Sensitive Whitening Toothpaste £2.79
I know this is a bit weird for a favourites post but for some unknown reason I've been all about having perfectly white teeth this month. This toothpaste is A-M-A-Z-I-N-G! I bought it purely because it was the smallest tube I could find for when I went away a few weeks ago. To my surprise it gave me such white teeth that I'll admit I spent a good 10 minutes staring at them in the mirror (and so did several of my friends whenever I opened my mouth!) as well as easing the sensitivity caused by dental surgery. I can't stop preaching about it! Seriously if you were ever to use one toothpaste for the rest of your life let it be this one!

Avon Glazewear Lipgloss in 'Pink Radiance' £5.00
I'm not an Avon girl myself but a friend had ordered this and gave it to me as the colour wasn't what she expected. It's a pretty shimmery blue toned pink which makes your teeth appear whiter (told you I was crazy for pageant teeth!) The formula is nice and if perhaps I ever did become an Avon girl, I'd for sure buy a few more!

Collection 2000 Hot Looks Nail Polish in 'BMX Bandit' £1.79
I've loved wearing it these past few weeks as its a bright happy colour without being neon - perfect from Summer to Fall transition! The Hot Looks polishes are some of my favourites because the drying time is like nothing I've achieved from another brand - ooh and I love the name!


Elvive Extraordinary Hair Oil £10
I decided to pick this up off a whim (aka I'm easily swayed by advertising but don't like to admit I have no will power whatsoever) It's actually for coloured hair but I couldn't imagine it would hurt a hair dye virgin so I gave it a try. Once, before shampooing as the bottle suggests and secondly, before hair drying. It made my hair a teeny weeny bit shinier, but the biggest difference was is softness! It recommends using only 2 pumps but as I have long hair (17 inches to be precise - measured this week!) I went for four expected it to weigh my hair down big-styley, but it didn't!

Soap and Glory Flake Away Exfoliant £7
Again for some crazy reason I decided to go all out on the homemade pedicures. Soaking, filing, buffing, painting, exfoliating - I scrimped on nothing! I had bought this scrub a few weeks previous just as an allover body buffer but found it far far far to gritty for everyday use. (imagine rubbing wet beach sand complete with the odd bits of broken shell and pebble allover your body!) It was perfect for my two tootsies though! And did I mention is smells amazing?


What are your favourite products this month?


Monday 27 August 2012

Wardrobe basics for a smooth Summer to Winter transition!


Before I begin I just want to thank Rachael for letting me make this guest post on her blog! I've decided to make a Summer to Winter transitions post to help you find an outfit that doesn't mean you have to buy a whole new wardrobe for the Winter.


Tights and knee highs
 Rather than wearing leggings or jeans pair your shorts, skirts and dresses with tights or knee high socks. Tights don't have to be plain, I have so many pairs of really cool tights and they can be so cheap depending on where you buy them. I usually get my tights from Primark just because I'm so clumsy and always get them caught on something, and end up with ladders. Primark sell their tights for around £2 a pair, which is a bargain!
  
Knee high socks give an edgy feel to most looks and there are so many different types to choose from!


Jumpers
I love wearing jumpers and I have so many of them. They look great paired with a studded shirt or a peter pan collar.


Boots
Boots are great in the cold weather, they keep your feet warm and stop them getting wet. Dr Martens are perfect but there are so many other boots that could work too.


4. Hats and Scarfs
Swap your floral headbands for a beanie. I love hats especially when I'm having a bad hair day! They can complete an outfit or just be worn for warmth, but either way they are a winter must have!


Snoods are easy to throw on without a worry and are great to grab when rushing out of the house.


Thank you again for letting me making this post and thank you for reading.
Check out my blog here!
 Floral Disaster x

Sunday 26 August 2012

DIY: Kimono inspired jacket


Hey everyone! I'm so happy to be guest blogging on A is for Ayla as I love everything about this blog!
I've been blogging for a bit more than a month now (click here to see my blog!) and I'm in love with blogging! So I'm gonna show you how to "recycle" your scarves into a kimono inspired jacket. I personally wear it as a bathing suit cover up (it's still supper hot here in Egypt) but you can wear it any way you want.
So let's get started!

Your gonna need a large rectangular scarf, a hanger and creativity!
(1) Knot both ends of the width together!
(2) Put the scarf on a hanger (I chose to put a T-shirt on the hanger to help me imagine how it looks). Make sure the knots are placed about where your waist will be.
(3) Take both ends and knot them together.
(4) Now the weird part that I don't really know how to explain. You're gonna take a part of the knot and put it inside the other part and then you're gonna do the same thing from the back so that it hides it!
(5) Adjust the back of the shirt to your likings and voilá you made a kimono inspired jacket!

Hope you enjoyed this tutorial!
Here's a little fun challenge, if you make this kimono inspired jacket send it to me on to my tumblr by clicking here and I'll pick my favourite one and feature the winner's blog or tumblr in my side bar. The deadline is 15 days after the post airs!
Good luck!
xoxo,


Saturday 25 August 2012

I Have Twitter!

Finally my blogger friends the time has come, I have officially joined the Twitter brigade! I'll admit I haven't got a bloody clue about hash tags, mentions, trends or whatever but what I can say is I have mastered the art of the retweet and have gathered myself a rather lonesome 2 followers. Any of you lovely people care to give me a pity follow? I follow back!;)

Follow my twitter (@aisforaylablog) by clicking here!


P.s I've just got my 250th gfc follower, Thank You to you all! Especially the girls at Look.Love.Wear!


DIY: Ombre Nail Art

Hello there so this is a little new to me and quite a honour I suppose to be posting a post on someone else's blog. So my name is Emily and I come from Emily's Blog  so today I thought I would do a post on ombre nails I have seen these about a lot and really wanted to try these out for myself and a little tutorial!

So on with how to...

Step 1- Choose two colours (maybe more if you wish but I find that two really works best) one darker and one lighter. The colours I used were:
No7 Cheeky Chops (lovely coral)
Leighton Denny Paparazzi (bright pink)
And Sally Hansen's Double Duty Base and Top Coat

And you will also need some make-up sponges, which you can find in almost anywhere for a couple of pounds.

And a little weird maybe but I took a peg and attached it to the sponge to give me a little handle and it was also better to work with.

Step 2- Apply a base coat to your nails and let that dry

Step 3- Paint a line of the darker colour on to some paper

Step 4 paint a line of the lighter colour just underneath

Step 5 get your sponge and sponge the colours together on to the paper to get also the access polish off...

...and dab onto the nail. I liked the effect of having the darker colour on the tip of my nail and then gradually getting lighter but it up to you which way round you fancy doing it ;)

do this on all your nails and if required and also remember for every nail you do need to apply more nail polish and continue until all nails are painted you can repeat it to get a more opaque finish and the brill thing about this is that it doesn't take that too long to dry- yay! And also don't forget to remove the nail polish around your nails. Add a top coat this helps add a lovely shine to your nails and also merges the colours together


And there you have it hopefully you will enjoy doing these and if you try this out please be sure to tweet me a picture @EmilysBlog I would love to see them! So I am sure there is more where that came from ;) Also just a quick “Thank you!” to Rachael for letting me do this post today xxx

Visit Emily's Blog by clicking here

Primark A/W Jewellery Picks!


Chevron Necklace - £4   /   Orange Statement Necklace - £5   /   Gold Metal Collar - £4   /   Aztec Bib Necklace - £8   /   Body Chain - £10   /   Studded Collar Necklace - £5   /   'Bubble' Necklace - £4

I for some reason love doing 'picks' posts, I have no idea why, I just love sifting through stock files for hours. I'm an odd child. These are pieces due to come in store throughout A/W. I love that Primark are toughening up, not only against rival high street stores, but with their merchandise, adding studs and heavy chains to their lines. I never in my wildest dreams thought I'd find a body chain in Primark! I'm eagerly awaiting the hand chain, I've been after the perfect one for over a year now after seeing one of the MIC girls wearing one in what? the first series?! I'd I think I'd die if this one looked good on me! I'm also not sure on how I feel about the J.Crew inspired *ahem!* rip off necklace bubble necklace as I mentioned in this post. You guys seemed fine with it so I saw no harm in including it in to my picks.

Urban Decay Naked Palette vs Sleek Storm Palette

Hey Guys! I apologise firstly for the lack of posting from myself. I had planned to try and post everyday for the month of August, however I've recently had a bit of concerning news about my health and I hope you'll all understand that Blogging hasn't been on the top of my agenda for the past few days. Thankfully though, I have some wonderful people who have willingly offered to do some guest posting for me, today I have a post from the rather lovely Rhi and Rach!

"Hey, Rachael has kindly agreed to let us guest post on her blog. Our names are Rhiannon and Rachel and we blog at Rhi &Rach. We are both big lovers of the neutral eye and thought we'd compare each of our favourite neutral eyeshadow palettes.We compared the colours in each palette to see how similar they were.


Packaging: 
The packaging on both of these palettes are both nice. They both have mirrors in them, although the Sleek mirror is larger which could be handy if doing your makeup on the go. The Sleek Palette is much more compact which makes it much more travel-friendly than the Naked Palette which is much bulkier in comparison. The packaging of the Sleek palette is more entirely black and is easy to clean, however the velvet texture is very difficult to clean and attracts dirty. As you can see in the pictures, the Naked Palette looks really dirty on the outside, while the Sleek Palette looks pretty clean.

Value for Money:
Both palettes contain 12 eyeshadows. The Sleek palette contains 12 x 1.1g for £7.99 while the Urban Decay palette has 12 x 1.3 g for £36.00. It also has a mini original Urban Decay Eyeshadow potion containing 3.75ml. The original edition of this also contains a double ended eyeliner of 2 x 0.5g. So the Urban Decay palette does contain more product but the Sleek palette definitely works out as the better value palette.

Pigmentation:
Both of the palettes had great pigmentation, except for one eyeshadow in the Sleek Palette (11) which took a lot of layering to get it to show up.


Left to Right: 12, Creep, 8, Gunmetal, 10

Urban Decay Creep and Sleek '12' are very similar, they look almost the same. Creep is slightly more shimmery though. Gunmetal and Sleek '8' are also very similar although '8' has slightly more blue tones to it. Sleek '10' is also quite similar but much more blue.


Left to Right: Sin, '5', Toasted, '6'


Urban Decay Sin is not particularly similar to Sleek '5' although they look quite similar in the pan. 'Sin' is a lighter pink while '5' has more red in it. Toasted and Sleek '6' aren't that similar, they are both brown but 'Toasted' is much more of a cool tone while '6' has more warm brown tones in it and is also more red.


Left to Right: Buck, '11, Naked, '3'


Buck is a much darker version of '11' but they are similar tones. '11' in the Sleek is quite poor payoff and is the only disappointment in the Sleek Storm Palette. Naked and '3' are both matte light brown colours. Naked is slightly more pigmented than '3' though.


Left to Right: Urban Decay 'Virgin', '2'


These are both similar in that they are both meant for highlight shades - good for the inner corner or under the brow bone. However, while Urban Decay Virgin is more pink toned/neutral, the Sleek '2' is definitely more warm toned and has more of a yellow tone to it. Both are nice highlights shade though.


Left to Right: Urban Decay Smog, '7', Darkhorse, Hustle


Urban Decay's 'Smog' is much more brown, while Sleek '7' is much more red toned. 'Smog' is the closest match for it, as both 'Darkhorse' and 'Hustle' are far more brown toned than '7'.


Left to Right: Sleek '1', Halfbaked, '4'

Both palettes have gold shades which are great as crease or all over the lid colours in a neutral eye look. Urban Decay 'Halfbaked' is a very pigmented shadow, this here is only 1 layer, while the others are 3. Halfbaked is more of an orange gold while both '1' and '4' are much more yellow. '1' is the closest match.


Left to Right: Urban Decay Sidecar, '5'

Sidecar isn't particularly similar to any of the Sleek shades as it is much more brown toned rather than pink toned. 


Sleek '9'

Sleek '9' is an emerald green which is very pretty. It doesn't match any of the colours in Urban Decay Naked Palette as it doesn't contain any greens. The sleek palette is much more varied in this aspect.

Overall:
The Sleek Palette is definitely a good alternative for the Naked Palette with the shades being very pigmented (bar one) and the colours are comparable to those in the Naked Palette.

Availability:
Sleek Storm Palette is £7.99 and available from Superdrug
Urban Decay Naked Palette is £36 and available from Debenhams."


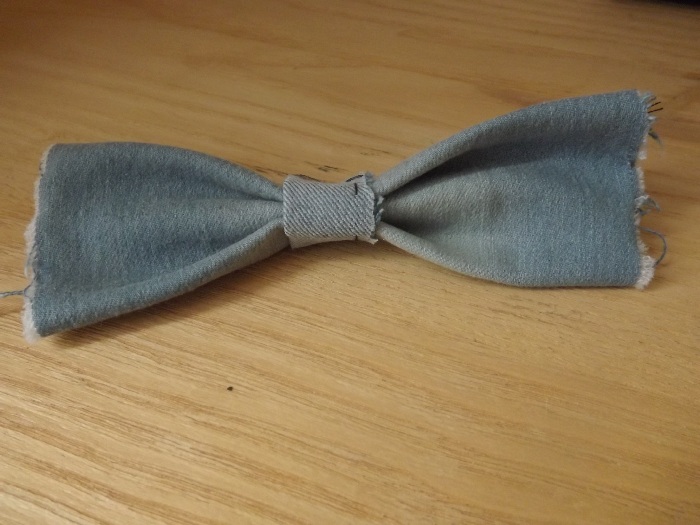
DIY: Distressed Denim Hair Bow

"Hello! I've been given an opportunity to do a guest post here on A is for Ayla and I'm really excited because I really love reading the blog. Her posts are wonderful and I actually really look forward to reading them.
So a bit about me before we start - my name is Amy and I've been blogging for just over a year, over at Marzipan Stairway. I mainly blog just about my life, fashion, beauty etc. I also really like photography so you might catch some of that over there too! I've never actually written a guest post before so this is all new to me! I was thinking about what I would write for this post and I decided I would do something that interests me but also something that I think would interest the readers of this blog and I eventually decided to write a DIY on making a hair bow easily for free! I'm really into little fashion/beauty type DIYs so I thought I would share some of that with you. I've tried to make it easy with step-by-step instructions and pictures.
Ok. Are you sitting comfortably? Yes? Then we'll begin.
What you'll need:
A pair of old denim shorts/jeans, scissors, needle and thread, a ruler, a pen, some super glue, a plain hair clip and some very basic sewing skills. You could use a sewing machine if you want but I know what a hassle things like this are if you don't have access to one and also, I quite like the way my bow turned out with my messy sewing!
Step 1
With a pen, draw 2 rectangles on your shorts/jeans - one of 15x12 cm and a smaller one of 6x4 cm and then cut them out. Try to cut right over the lines so that you can't see the pen lines when you're finished. As you can see, I did not do a very good job of this. HA. The larger rectangle will make the main bow part and the smaller one will be the part that goes round the middle.
Step 2
Fold each of the rectangles in half width-wise and sew up the edges. My sewing is not at all neat and I didn't use a sewing machine (which you can, if you'd rather) but I like it like that. I also turned the smaller rectangle in half so that the inside of the denim is showing, just to make a little bit of contrast in the finished bow. You can do the same if you want or just leave the right side showing.
Step 3
Open your scissors and place them on the edge of the larger rectangle as if you were going to cut BUT DON'T ACTUALLY CUT! Simply pull the open scissors from left to right along the edge to create the distressed look we're after here. Do this until enough of the little threads are sticking out the sides.
Step 4
For this step, first move the seam of the larger rectangle into the middle. Remember when you were little you would make fans out of paper by folding about an inch of paper forward then turning it over and folding it back on itself? This is like that. Make a little fan out of the larger rectangle but instead of pinching it at the end of the bow, pinch it in the middle. I'm sorry. I haven't explained very well.
Step 5
Quickly put a stitch through the middle of the bow where you were holding it before. It doesn't have to be neat or tight because you're going to cover it over in the next step. It's just to make it easier while you do the next bit so you don't have to hold it.
Step 6
Next, take the smaller rectangle and wrap it around the middle of the bow where you put the stitch in the last step. Put the two edges together at the back of the bow and sew them together. Also try to put your needle through the middle of the bow to stop the smaller rectangle sliding to-and-fro.
Step 7
Take a dab of super glue and attach the hair clip to the back of the bow. Make sure you do it the right way! Hold it there for 10 seconds or so and then it should be properly stuck.
And there you have it! A virtually free bow that you can make with pretty much no hassle. Also, it looks pretty, no?
So. I hope you liked my post, and I just wanted to thank Rachael for letting me write this post on her blog! If you did like this, come over and visit me at my blog - there's a lot more where that came from! x"

Wednesday 15 August 2012

Gradual Tanners - Johnsons Holiday Skin Vs Garnier Summer Body


Whether you want to admit it or not our Summer weather has pretty much been and gone and there aren't many signs to show of it. Winter can leave our skin paler than ever, which is why I've compiled a mini series of posts with the best tips and ideas to bring about a wonderful post-summer glow to take you through to the winter. This post is a comparison between what I believe are the two best selling drugstore gradual tanners, a tool perfect for subtly faking a fabulous tan.

Garnier (Top), Johnsons (Bottom)

I'll give a few notes about each product before we get in to the comparison. The Johnsons Holiday Skin I will be reviewing is the Medium to Dark shade. It claims to have a 'subtle, fresh fragrance to avoid aftersmell' and says the tan will develop fully after 3-4 days. The Garnier Summer Body is one surrounded by controversy as many people said it left them with large rashes which were difficult to manage (if testing you should be aware of this possibility). The lotion claims to gradually build a tan with every application, but does not state a time period for when you can expect visable results. The apricot scented lotion appears to be advertised more as a moisturiser for 'deeper skin tones' than a gradual tanner as it doesn't mention very many details about the tanning element of the product.


Garnier (Left), Johnsons (Right) Top Photos (w/ flash) Bottom Photos (w/o flash)
 Sorry about the garnier flash exposure, was the best I could get!

And now for a few notes after:
You should note that I applied the same amount of each product to each arm and left the product for 4 days (the time period suggested for Johnsons) The Johnsons lotion has such a 'subtle' scent that when I applied it I had every member of my family walking upstairs asking what that 'awful' smell was! Although slightly orange at first, the Garnier tanner was AMAZING on most counts (as you can easily see in the table!) And so I think I can officially crown Garnier Summer Body as the winner of the Great Gradual Tan Off!

What's your favourite tanning product?